Chat Client API
The ChatClient offers a fluent API for communicating with an AI Model.
It supports both a Promise-based programming model and an RxJS-based streaming model (with an AsyncIterable adapter).
|
See the Implementation Notes at the bottom of this document for the differences between Promise-based and reactive call paths in |
The fluent API has methods for building up the constituent parts of a Prompt that is passed to the AI model as input.
The Prompt contains the instructional text to guide the AI model’s output and behavior. From the API point of view, prompts consist of a collection of messages.
The AI model processes two main types of messages: user messages, which are direct inputs from the user, and system messages, which are generated by the system to guide the conversation.
These messages often contain placeholders that are substituted at runtime based on user input to customize the response of the AI model to the user input.
There are also Prompt options that can be specified, such as the name of the AI Model to use and the temperature setting that controls the randomness or creativity of the generated output.
Creating a ChatClient
A ChatClient is created from a ChatModel. NestJS AI exposes three idiomatic ways to obtain one:
-
ChatClient.create(chatModel)— convenience factory that returns aChatClientwith no defaults. -
ChatClient.builder(chatModel)— returns aChatClient.Builderfor full control over default options, advisors, system prompts, tools, and the template renderer. -
Inject
CHAT_CLIENT_BUILDER_TOKEN(alias@InjectChatClientBuilder()) — a transient builder produced byChatClientModulethat has already been customized through your module configuration.
Using ChatClient.create()
The simplest pattern is to inject the configured ChatModel and create a ChatClient per service:
import { Controller, Get, Query } from '@nestjs/common';
import { ChatClient } from '@nestjs-ai/client-chat';
import { InjectChatModel } from '@nestjs-ai/platform';
import type { ChatModel } from '@nestjs-ai/model';

@Controller()
export class ChatController {
  private readonly chatClient: ChatClient;

  constructor(@InjectChatModel() chatModel: ChatModel) {
    this.chatClient = ChatClient.create(chatModel);
  }

  @Get('/ai')
  async generation(@Query('userInput') userInput: string): Promise<string | null> {
    return this.chatClient.prompt().user(userInput).call().content();
  }
}
The call() method instructs ChatClient to use a Promise-based call path; the actual model invocation happens when a terminal method such as content(), chatResponse(), or entity() is awaited.
Using the Configured Builder from ChatClientModule
When your AppModule imports ChatClientModule.forFeature({ customizer }), the module produces a transient ChatClient.Builder that has already had your defaults applied. Inject it and call build():
import { Controller, Get, Query } from '@nestjs/common';
import { ChatClient } from '@nestjs-ai/client-chat';
import { InjectChatClientBuilder } from '@nestjs-ai/platform';

@Controller()
export class ChatController {
  private readonly chatClient: ChatClient;

  constructor(@InjectChatClientBuilder() builder: ChatClient.Builder) {
    this.chatClient = builder.build();
  }

  @Get('/ai')
  async generation(@Query('userInput') userInput: string): Promise<string | null> {
    return this.chatClient.prompt().user(userInput).call().content();
  }
}
CHAT_CLIENT_BUILDER_TOKEN is registered with Scope.TRANSIENT, so each consumer receives a fresh builder.
|
Working with Multiple Chat Models
There are several scenarios where you might need to work with multiple chat models in a single application:
-
Using different models for different types of tasks (e.g., a powerful model for complex reasoning and a faster, cheaper model for simpler tasks)
-
Implementing fallback mechanisms when one model service is unavailable
-
A/B testing different models or configurations
-
Providing users with a choice of models based on their preferences
-
Combining specialized models (one for code generation, another for creative content, etc.)
NestJS AI does not autoconfigure a single global ChatClient — every chat model module is imported explicitly. To wire multiple models, register each *ChatModelModule in its own dynamic feature module and re-export the chat client builder under a custom token.
Multiple ChatClients with a Single Model Type
Create distinct ChatClient instances programmatically by reusing the same ChatModel:
import { ChatClient } from '@nestjs-ai/client-chat';
import type { ChatModel } from '@nestjs-ai/model';

// `chatModel` is provided by an OpenAiChatModelModule, AnthropicChatModelModule, etc.
const chatClient = ChatClient.create(chatModel);

// Or use the builder for more control
const customChatClient = ChatClient.builder(chatModel)
  .defaultSystem('You are a helpful assistant.')
  .build();
ChatClients for Different Model Types
When working with multiple AI models, isolate each chat model in its own NestJS module and expose a typed provider:
import { Module } from '@nestjs/common';
import { ChatClient } from '@nestjs-ai/client-chat';
import { OpenAiChatModelModule } from '@nestjs-ai/model-openai';
import { AnthropicChatModelModule } from '@nestjs-ai/model-anthropic';
import { CHAT_MODEL_TOKEN } from '@nestjs-ai/commons';
import type { ChatModel } from '@nestjs-ai/model';

export const OPENAI_CHAT_CLIENT = Symbol.for('OPENAI_CHAT_CLIENT');
export const ANTHROPIC_CHAT_CLIENT = Symbol.for('ANTHROPIC_CHAT_CLIENT');

@Module({
  imports: [
    OpenAiChatModelModule.forFeature({
      apiKey: process.env.OPENAI_API_KEY,
      options: { model: 'gpt-4o-mini' },
    }),
  ],
  providers: [
    {
      provide: OPENAI_CHAT_CLIENT,
      useFactory: (chatModel: ChatModel) => ChatClient.create(chatModel),
      inject: [CHAT_MODEL_TOKEN],
    },
  ],
  exports: [OPENAI_CHAT_CLIENT],
})
export class OpenAiChatClientModule {}

@Module({
  imports: [
    AnthropicChatModelModule.forFeature({
      apiKey: process.env.ANTHROPIC_API_KEY,
      options: { model: 'claude-3-5-sonnet-latest' },
    }),
  ],
  providers: [
    {
      provide: ANTHROPIC_CHAT_CLIENT,
      useFactory: (chatModel: ChatModel) => ChatClient.create(chatModel),
      inject: [CHAT_MODEL_TOKEN],
    },
  ],
  exports: [ANTHROPIC_CHAT_CLIENT],
})
export class AnthropicChatClientModule {}
You can then inject these tokens into your services using @Inject():
import { Inject, Injectable } from '@nestjs/common';
import type { ChatClient } from '@nestjs-ai/client-chat';
import { ANTHROPIC_CHAT_CLIENT, OPENAI_CHAT_CLIENT } from './chat-clients.module.js';

@Injectable()
export class ChatRouter {
  constructor(
    @Inject(OPENAI_CHAT_CLIENT) private readonly openAi: ChatClient,
    @Inject(ANTHROPIC_CHAT_CLIENT) private readonly anthropic: ChatClient,
  ) {}

  async ask(provider: 'openai' | 'anthropic', input: string): Promise<string | null> {
    const client = provider === 'openai' ? this.openAi : this.anthropic;
    return client.prompt(input).call().content();
  }
}
ChatClient Fluent API
The ChatClient fluent API allows you to create a prompt in four distinct ways using overloads of the prompt method:
-
prompt(): Starts the fluent API with no preset content, allowing you to build up user, system, and other parts of the prompt. -
prompt(prompt: Prompt): Accepts aPromptinstance built using the non-fluentPromptAPI. -
prompt(content: string): Convenience overload that takes the user’s text content. -
prompt(props: ChatClient.ChatClientRequestProps): Accepts an object literal describing user/system text, messages, advisors, tools, and options. This is unique to NestJS AI and lets you compose a request without chaining methods.
// Object-literal form
const response = await chatClient
  .prompt({
    system: 'You are a helpful assistant.',
    user: { text: 'Tell me a joke about {topic}', params: { topic: 'space' } },
    options: ChatOptions.builder().temperature(0.7),
  })
  .call()
  .content();
ChatClient Responses
The ChatClient API offers several ways to format the response from the AI Model using the fluent API.
Returning a ChatResponse
The response from the AI model is a rich structure defined by the type ChatResponse.
It includes metadata about how the response was generated and can also contain multiple responses, known as Generations, each with its own metadata.
The metadata includes the number of tokens (each token is approximately 3/4 of a word) used to create the response.
This information is important because hosted AI models charge based on the number of tokens used per request.
An example to return the ChatResponse object that contains the metadata is shown below by invoking chatResponse() after the call() method.
const chatResponse = await chatClient
  .prompt()
  .user('Tell me a joke')
  .call()
  .chatResponse();
Returning an Entity
You often want to return a typed object that is mapped from the returned String.
The entity() method provides this functionality and accepts any Standard Schema–compatible schema (Zod, Valibot, ArkType, …) or a JSON Schema literal typed via json-schema-to-ts.
For example, given the Zod schema:
import { z } from 'zod';

const ActorFilms = z.object({
  actor: z.string(),
  movies: z.array(z.string()),
});
You can map the AI model’s output to that schema using the entity() method:
const actorFilms = await chatClient
  .prompt()
  .user('Generate the filmography for a random actor.')
  .call()
  .entity(ActorFilms);
// actorFilms is typed as { actor: string; movies: string[] } | null
To return a collection, declare the schema as an array — there is no separate ParameterizedTypeReference overload because TypeScript’s type system already carries the element type:
const ActorFilmsList = z.array(ActorFilms);

const actorFilms = await chatClient
  .prompt()
  .user('Generate the filmography of 5 movies for Tom Hanks and Bill Murray.')
  .call()
  .entity(ActorFilmsList);
You can also pass a plain JSON Schema literal:
import type { JSONSchema } from 'json-schema-to-ts';

const schema = {
  type: 'object',
  properties: {
    actor: { type: 'string' },
    movies: { type: 'array', items: { type: 'string' } },
  },
  required: ['actor', 'movies'],
} as const satisfies JSONSchema;

const actorFilms = await chatClient
  .prompt()
  .user('Generate the filmography for a random actor.')
  .call()
  .entity(schema);
Native Structured Output
As more AI models support structured output natively, you can take advantage of this feature by using the AdvisorParams.ENABLE_NATIVE_STRUCTURED_OUTPUT advisor parameter when calling the ChatClient.
Use defaultAdvisors() on the ChatClient.Builder to set this parameter globally for all calls or set it per call as shown below:
import { AdvisorParams } from '@nestjs-ai/client-chat';

const actorFilms = await chatClient
  .prompt()
  .advisors(AdvisorParams.ENABLE_NATIVE_STRUCTURED_OUTPUT)
  .user('Generate the filmography for a random actor.')
  .call()
.entity(ActorFilms);| Some AI models such as OpenAI don’t support arrays of objects natively. In such cases, you can use the NestJS AI default structured output conversion. |
Streaming Responses
The stream() method returns an RxJS Observable of incremental tokens. The terminal method shape mirrors call():
import type { Observable } from 'rxjs';

const output: Observable<string> = chatClient
  .prompt()
  .user('Tell me a joke')
  .stream()
  .content();
You can also stream the ChatResponse directly with chatResponse(): Observable<ChatResponse>, or consume the stream as an AsyncIterable to integrate with for await … of:
for await (const chunk of chatClient
  .prompt()
  .user('Tell me a joke')
  .stream()
  .contentIterable()) {
  process.stdout.write(chunk);
}
There is no streaming entity() overload yet. To convert an aggregated stream into an entity today, collect the chunks and pass the result through the Structured Output Converter:
import { firstValueFrom } from 'rxjs';
import { toArray } from 'rxjs/operators';
import { StandardSchemaOutputConverter } from '@nestjs-ai/model';
import { z } from 'zod';

const ActorsFilms = z.array(z.object({ actor: z.string(), movies: z.array(z.string()) }));
const converter = new StandardSchemaOutputConverter({ schema: ActorsFilms });

const chunks = await firstValueFrom(
  chatClient
    .prompt()
    .user((u) =>
      u
        .text('Generate the filmography for a random actor.\n{format}')
        .param('format', converter.format),
    )
    .stream()
    .content()
    .pipe(toArray()),
);

const actorFilms = await converter.convert(chunks.join(''));
Prompt Templates
The ChatClient fluent API lets you provide user and system text as templates with variables that are replaced at runtime.
const answer = await ChatClient.create(chatModel)
  .prompt()
  .user((u) =>
    u
      .text('Tell me the names of 5 movies whose soundtrack was composed by {composer}')
      .param('composer', 'John Williams'),
  )
  .call()
  .content();
Internally, ChatClient resolves a TemplateRenderer implementation through TemplateRendererFactory (from @nestjs-ai/commons). The factory returns a delegating renderer that picks an underlying engine at request time:
-
When
@nestjs-ai/template-stis installed andNestAiModule.forRoot()is imported into your module graph, the platform bindsStTemplateRendererat module init. This implementation is built on top of the open-source stringtemplate4ts library — a TypeScript port of Terence Parr’s StringTemplate engine — and supports the full StringTemplate feature set (custom delimiters, ST functions, validation modes). -
Otherwise, the factory falls back to
SimpleTemplateRenderer(in@nestjs-ai/commons), a lightweight{var}placeholder renderer with no StringTemplate features.
NestJS AI also provides a NoOpTemplateRenderer (in @nestjs-ai/commons) for cases where no template processing is desired.
The TemplateRenderer configured directly on the ChatClient (via .templateRenderer()) applies only to the prompt content defined directly in the ChatClient builder chain (e.g., via .user(), .system()).
It does not affect templates used internally by Advisors like QuestionAnswerAdvisor, which have their own template customization mechanisms (see Custom Advisor Templates).
|
If you’d rather use a different template engine, you can provide a custom implementation of the TemplateRenderer interface directly to ChatClient. You can also keep using the default StTemplateRenderer, but with a custom configuration.
For example, by default, template variables are identified by the {} syntax.
If you’re planning to include JSON in your prompt, you might want to use a different syntax to avoid conflicts with JSON syntax. For example, you can use the < and > delimiters.
import { StTemplateRenderer } from '@nestjs-ai/template-st';

const answer = await ChatClient.create(chatModel)
  .prompt()
  .user((u) =>
    u
      .text('Tell me the names of 5 movies whose soundtrack was composed by <composer>')
      .param('composer', 'John Williams'),
  )
  .templateRenderer(
    new StTemplateRenderer({ startDelimiterToken: '<', endDelimiterToken: '>' }),
  )
  .call()
  .content();
call() return values
After invoking call() on ChatClient, the following methods are available on the returned CallResponseSpec:
-
content(): Promise<string | null>— returns the string content of the response. -
chatResponse(): Promise<ChatResponse | null>— returns theChatResponseobject that contains multiple generations and also metadata about the response, for example how many tokens were used to create the response. -
chatClientResponse(): Promise<ChatClientResponse>— returns aChatClientResponseobject that contains theChatResponseand the ChatClient execution context, giving you access to additional data used during the execution of advisors (e.g. the relevant documents retrieved in a RAG flow). -
entity(…)— returns a typed value:-
entity(schema)— accepts any Standard Schema (Zod, Valibot, ArkType, …) or a JSON Schema literal. -
entity(schema, transformer)— runs the transformer on the inferred output type. -
entity(structuredOutputConverter)— accepts an instance ofStructuredOutputConverterfor full control over conversion.
-
-
responseEntity(…)— returns aResponseEntity<ChatResponse, T>that holds both the completeChatResponseand the structured output. Useful when you need access to both the raw model metadata and the typed result in a single call. The same overloads asentity(…)are available.
You can also invoke the stream() method instead of call().
Calling call() does not actually trigger the AI model execution. Instead, it only instructs ChatClient to use the Promise-based call path. The actual AI model invocation occurs when methods such as content(), chatResponse(), entity(), or responseEntity() are awaited.
|
stream() return values
After invoking stream() on ChatClient, the following methods are available on the returned StreamResponseSpec:
-
content(): Observable<string>— returns an RxJSObservableof the string being generated by the AI model. -
chatResponse(): Observable<ChatResponse>— returns anObservableofChatResponse, which contains additional metadata about the response. -
chatClientResponse(): Observable<ChatClientResponse>— returns anObservableofChatClientResponse, giving you access to advisor execution context (e.g. retrieved RAG documents). -
contentIterable(): AsyncIterable<string>—for awaitadapter overcontent(). -
chatResponseIterable(): AsyncIterable<ChatResponse>—for awaitadapter overchatResponse(). -
chatClientResponseIterable(): AsyncIterable<ChatClientResponse>—for awaitadapter overchatClientResponse().
Message Metadata
The ChatClient supports adding metadata to both user and system messages.
Metadata provides additional context and information about messages that can be used by the AI model or downstream processing.
Adding Metadata to User Messages
You can add metadata to user messages using the metadata() methods:
// Adding individual metadata key-value pairs
const response = await chatClient
  .prompt()
  .user((u) =>
    u
      .text("What's the weather like?")
      .metadata('messageId', 'msg-123')
      .metadata('userId', 'user-456')
      .metadata('priority', 'high'),
  )
  .call()
  .content();

// Adding multiple metadata entries at once
const userMetadata = new Map<string, unknown>([
  ['messageId', 'msg-123'],
  ['userId', 'user-456'],
  ['timestamp', Date.now()],
]);

const response2 = await chatClient
  .prompt()
  .user((u) => u.text("What's the weather like?").metadata(userMetadata))
  .call()
  .content();
Adding Metadata to System Messages
Similarly, you can add metadata to system messages:
const response = await chatClient
  .prompt()
  .system((s) =>
    s
      .text('You are a helpful assistant.')
      .metadata('version', '1.0')
      .metadata('model', 'gpt-4'),
  )
  .user('Tell me a joke')
  .call()
  .content();
Default Metadata Support
You can also configure default metadata at the ChatClient builder level by passing a customizer to ChatClientModule.forFeature():
import { Module } from '@nestjs/common';
import { ChatClientModule } from '@nestjs-ai/client-chat';

@Module({
  imports: [
    ChatClientModule.forFeature({
      customizer: (builder) =>
        builder
          .defaultSystem((s) =>
            s
              .text('You are a helpful assistant')
              .metadata('assistantType', 'general')
              .metadata('version', '1.0'),
          )
          .defaultUser((u) =>
            u.text('Default user context').metadata('sessionId', 'default-session'),
          ),
    }),
  ],
})
export class ChatModule {}Using Defaults
Creating a ChatClient with a default system text via ChatClientModule.forFeature({ customizer }) simplifies runtime code.
By setting defaults, you only need to specify the user text when calling ChatClient, eliminating the need to set a system text for each request in your runtime code path.
Default System Text
In the following example, we will configure the system text to always reply in a pirate’s voice. To avoid repeating the system text in runtime code, we customize the builder once at module configuration time.
import { Module } from '@nestjs/common';
import { ChatClientModule } from '@nestjs-ai/client-chat';

@Module({
  imports: [
    ChatClientModule.forFeature({
      customizer: (builder) =>
        builder.defaultSystem(
          'You are a friendly chat bot that answers question in the voice of a Pirate',
        ),
    }),
  ],
})
export class PirateChatModule {}
…and a controller to invoke it:
import { Controller, Get, Query } from '@nestjs/common';
import { ChatClient } from '@nestjs-ai/client-chat';
import { InjectChatClientBuilder } from '@nestjs-ai/platform';

@Controller('ai')
export class AiController {
  private readonly chatClient: ChatClient;

  constructor(@InjectChatClientBuilder() builder: ChatClient.Builder) {
    this.chatClient = builder.build();
  }

  @Get('/simple')
  async completion(
    @Query('message') message = 'Tell me a joke',
  ): Promise<{ completion: string | null }> {
    return { completion: await this.chatClient.prompt().user(message).call().content() };
  }
}
When calling the application endpoint via curl, the result is:
❯ curl localhost:3000/ai/simple
{"completion":"Why did the pirate go to the comedy club? To hear some arrr-rated jokes! Arrr, matey!"}
Default System Text with parameters
In the following example, we will use a placeholder in the system text to specify the voice of the completion at runtime instead of design time.
@Module({
  imports: [
    ChatClientModule.forFeature({
      customizer: (builder) =>
        builder.defaultSystem(
          'You are a friendly chat bot that answers question in the voice of a {voice}',
        ),
    }),
  ],
})
export class VoiceChatModule {}
@Controller('ai')
export class AiController {
private readonly chatClient: ChatClient;
constructor(@InjectChatClientBuilder() builder: ChatClient.Builder) {
this.chatClient = builder.build();
}
@Get()
async completion(
@Query('message') message = 'Tell me a joke',
@Query('voice') voice = 'Robert DeNiro',
): Promise<{ completion: string | null }> {
return {
completion: await this.chatClient
.prompt()
.system((sp) => sp.param('voice', voice))
.user(message)
.call()
.content(),
};
}
}When calling the application endpoint via httpie, the result is:
http localhost:3000/ai voice=='Robert DeNiro'
{
    "completion": "You talkin' to me? Okay, here's a joke for ya: Why couldn't the bicycle stand up by itself? Because it was two tired! Classic, right?"
}
Other defaults
At the ChatClient.Builder level, you can specify the default prompt configuration:
-
defaultOptions(optionsCustomizer: ChatOptions.Builder): Pass in either portable options defined in theChatOptionsclass or model-specific options such as those produced byOpenAiChatOptions.builder(). For more information on model-specificChatOptionsimplementations, refer to the TypeDoc. -
defaultUser(text)/defaultUser(buffer, charset)/defaultUser((u) ⇒ …): Defines the user text. The consumer overload lets you set the user text and any default parameters. -
defaultSystem(text)/defaultSystem(buffer, charset)/defaultSystem((s) ⇒ …): Defines the system text. The consumer overload lets you set the system text and any default parameters. -
defaultTools(…toolObjects)/defaultToolNames(…toolNames)/defaultToolCallbacks(…callbacks)/defaultToolContext(toolContext): Configures default tools available to the model. See Tool Calling for details on each form. -
defaultAdvisors(…advisor): Advisors allow modification of the data used to create thePrompt. TheQuestionAnswerAdvisorimplementation enables the pattern ofRetrieval Augmented Generationby appending the prompt with context information related to the user text. -
defaultAdvisors((advisorSpec) ⇒ …): Lets you configure multiple advisors using theAdvisorSpecconsumer. Advisors can modify the data used to create the finalPrompt. -
defaultTemplateRenderer(templateRenderer): Replaces the defaultStTemplateRendererfor the entire builder.
You can override these defaults at runtime using the corresponding methods without the default prefix:
-
options(optionsCustomizer: ChatOptions.Builder) -
user(text)/user(buffer, charset)/user((u) ⇒ …) -
system(text)/system(buffer, charset)/system((s) ⇒ …) -
tools(…toolObjects)/toolNames(…names)/toolCallbacks(…callbacks)/toolContext(toolContext) -
advisors(…advisor)/advisors((advisorSpec) ⇒ …) -
templateRenderer(templateRenderer)
Advisors
The Advisors API provides a flexible and powerful way to intercept, modify, and enhance AI-driven interactions in your NestJS applications.
A common pattern when calling an AI model with user text is to append or augment the prompt with contextual data.
This contextual data can be of different types. Common types include:
-
Your own data: This is data the AI model hasn’t been trained on. Even if the model has seen similar data, the appended contextual data takes precedence in generating the response.
-
Conversational history: The chat model’s API is stateless. If you tell the AI model your name, it won’t remember it in subsequent interactions. Conversational history must be sent with each request to ensure previous interactions are considered when generating a response.
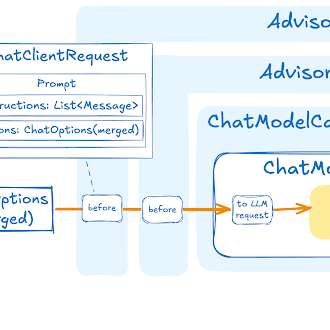
Advisor Configuration in ChatClient
The ChatClient fluent API provides an AdvisorSpec interface for configuring advisors.
This interface offers methods to add parameters, set multiple parameters at once, and add one or more advisors to the chain.
export interface AdvisorSpec {
  param(k: string, v: unknown): AdvisorSpec;
  params(p: Map<string, unknown>): AdvisorSpec;
  advisors(...advisors: Advisor[]): AdvisorSpec;
  advisors(advisors: Advisor[]): AdvisorSpec;
}| The order in which advisors are added to the chain is crucial, as it determines the sequence of their execution. Each advisor modifies the prompt or the context in some way, and the changes made by one advisor are passed on to the next in the chain. |
import { ChatClient, MessageChatMemoryAdvisor } from '@nestjs-ai/client-chat';
import { QuestionAnswerAdvisor } from '@nestjs-ai/advisors-vector-store';
import { SearchRequest } from '@nestjs-ai/vector-store';

const response = await ChatClient.builder(chatModel)
  .build()
  .prompt()
  .advisors(
    new MessageChatMemoryAdvisor({ chatMemory }),
    new QuestionAnswerAdvisor({
      vectorStore,
      searchRequest: SearchRequest.builder().topK(4).build(),
    }),
  )
  .user(userText)
  .call()
  .content();
In this configuration, the MessageChatMemoryAdvisor will be executed first, adding the conversation history to the prompt.
Then, the QuestionAnswerAdvisor will perform its search based on the user’s question and the added conversation history, potentially providing more relevant results.
Retrieval Augmented Generation
Refer to the Retrieval Augmented Generation guide.
Logging
The SimpleLoggerAdvisor is an advisor that logs the request and response data of the ChatClient.
This can be useful for debugging and monitoring your AI interactions.
| NestJS AI supports observability for LLM and vector store interactions. Refer to the Observability guide for more information. |
To enable logging, add the SimpleLoggerAdvisor to the advisor chain when creating your ChatClient.
It’s recommended to add it toward the end of the chain:
import { ChatClient, SimpleLoggerAdvisor } from '@nestjs-ai/client-chat';

const response = await ChatClient.create(chatModel)
  .prompt()
  .advisors(new SimpleLoggerAdvisor())
  .user('Tell me a joke?')
  .call()
  .chatResponse();
SimpleLoggerAdvisor writes to the @nestjs-port/core LoggerFactory at DEBUG level. The platform module wires the logger factory to NestJS’s Logger by default, so set the NestJS log level to include debug (or verbose) to see the output:
const app = await NestFactory.create(AppModule, {
  logger: ['error', 'warn', 'log', 'debug', 'verbose'],
});
You can customize what data is logged by passing a props object to the constructor:
export interface SimpleLoggerAdvisorProps {
  requestToString?: (request: ChatClientRequest | null) => string;
  responseToString?: (response: ChatResponse | null) => string;
  order?: number;
}
Example usage:
const customLogger = new SimpleLoggerAdvisor({
  requestToString: (request) =>
    `Custom request: ${request?.prompt.lastUserOrToolResponseMessage.text ?? ''}`,
  responseToString: (response) => `Custom response: ${response?.result?.output.text ?? ''}`,
  order: 0,
});
This allows you to tailor the logged information to your specific needs.
| Be cautious about logging sensitive information in production environments. |
Chat Memory
The class ChatMemory represents a storage for chat conversation memory.
It provides methods to add messages to a conversation, retrieve messages from a conversation, and clear the conversation history.
There is currently one built-in implementation: MessageWindowChatMemory.
MessageWindowChatMemory is a chat memory implementation that maintains a window of messages up to a specified maximum size (default: 20 messages).
When the number of messages exceeds this limit, older messages are evicted, but system messages are preserved.
If a new system message is added, all previous system messages are removed from memory.
This ensures that the most recent context is always available for the conversation while keeping memory usage bounded.
MessageWindowChatMemory is backed by the ChatMemoryRepository abstraction which provides storage implementations for the chat conversation memory.
The following implementations are currently available in NestJS AI: InMemoryChatMemoryRepository (in @nestjs-ai/model), MongoChatMemoryRepository (in @nestjs-ai/model-chat-memory-repository-mongodb), RedisChatMemoryRepository (in @nestjs-ai/model-chat-memory-repository-redis), and JdbcChatMemoryRepository (in @nestjs-ai/model-chat-memory-repository-jsdbc, supporting MySQL, PostgreSQL, Oracle, SQL Server, and SQLite).
For more details and usage examples, see the Chat Memory documentation.
Implementation Notes
The combined use of Promise-based and reactive (RxJS) programming models in ChatClient is a unique aspect of the API.
A typical NestJS application uses Promises throughout, while ChatClient exposes both forms so callers can choose per request.
-
Streaming is implemented on top of an RxJS
Observable. Thestream()spec also provides*Iterable()adapters that wrap theObservableinAsyncIterable, so consumers can use either RxJS operators orfor await … ofwithout a separate code path. -
Non-streaming
call()uses Promises end to end. Awaitingcontent(),chatResponse(), orentity()triggers a single model invocation and resolves with the result. -
Tool calling and the built-in advisors mix the two paths:
call()performs blocking-style awaits, whilestream()uses RxJS schedulers. Each advisor exposes ascheduleroption (defaulting toBaseAdvisor.DEFAULT_SCHEDULER) so you can pick a different scheduler when running on tight event loops. -
The HTTP client used by every model module can be replaced through
NestAiModule.forRoot({ httpClient }). The default isFetchHttpClientfrom@nestjs-port/core, which uses the platform’s globalfetch.

